
Understanding Solar Panel Wiring
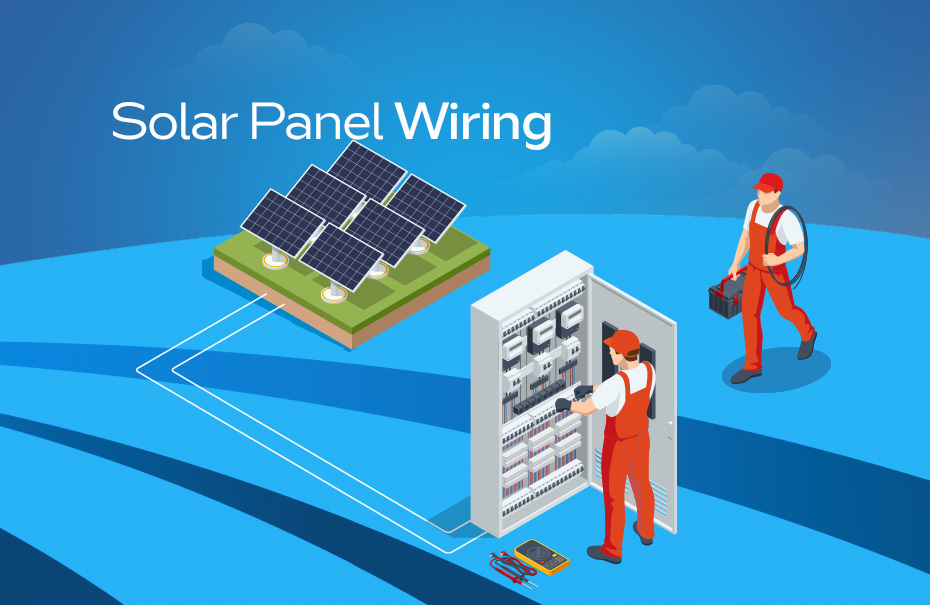
To effectively use solar energy, one must be familiar with solar panel wiring. Installing individual solar panels into a larger photovoltaic (PV) system is the core of solar panel wiring. Then how is it put into effect?
Simply said, solar panel wiring is the process of connecting individual solar panels in a preset arrangement to produce power. The photovoltaic cells included in solar panels transform the energy from sunlight into DC power as soon as it reaches them. Powering electrical equipment or storing it in batteries for later use, this electricity then travels via the wire system.
Depending on the application, solar panel wiring can use either a series or parallel arrangement of panels. But before we get into such setups, there are a few solar panel wiring terms that you must be acquainted with.
Grasping these terms is the first step in learning how solar panel wiring works. Armed with this information, we can go into the two primary solar panel wiring configurations: series and parallel.
Electrical Terms Related to Solar Panel Wiring
Most certainly, you must come across terms like voltage, amperage, or many others when you go for solar panel inquiry. Most of you have zero idea why these terms are important to learn. Well, when you install solar panels, understanding these terms will help you choose the most suitable one to fulfill your needs.
Voltage
Voltage, represented by the letter “V,” is the difference in charge between two points in an electrical circuit. This difference causes electricity to “flow,” which is why voltage is frequently compared to the water pressure in a home’s plumbing system.
Temperature impacts solar panel voltage via a temperature coefficient of voltage (TCV). These equations express the percentage change in voltage output per degree Celsius temperature difference. A positive temperature coefficient of voltage indicates that when the temperature rises, the voltage output drops by a given percentage.
Amperage
Amperage is the speed at which electrons migrate from places of high pressure (voltage) to areas of low pressure. This rate is referred to as electrical current and is measured in amps, or “A.” In plumbing terms, amperage is similar to water flow.
Amperage, or current, is an essential part of solar panel wiring. It calculates the size of the electrical wires required to safely and effectively manage the current, assuring optimal operation while limiting the danger of overheating or electrical risks.
Wattage
Wattage, or power, is a major consideration in solar panel wiring since it determines the maximum amount of energy the solar panels can produce. Proper wire size and arrangement are required to accommodate and safely manage the produced power.
Watt’s Law combines watts, volts, and amps: Watts = (Volts x Amps).
This formula not only informs you about the solar panels and inverters to use for a certain PV system, but it also tells you whether to use series or parallel solar wiring in your installation.
Options in Solar Panel Wiring
Solar Panel Wiring in Series
The earliest technique for connecting solar panels is known as “Series Wiring”. The electrical connection of solar panels in series improves the overall system output voltage. When you have a grid-connected inverter or charge controller that needs 24 volts or higher, you ought to use a series of connected solar panels. To series wire the panels, connect the positive terminal to the negative terminal of each panel until you have a single positive and negative connection. Solar panels in series add or collect the voltages generated by each panel, resulting in the array’s total output voltage, as indicated.
Solar Panels in Series with Same Voltages
In this system, all solar panels have the same type and power rating. The total voltage output is the sum of the voltage outputs from each panel. Using the same three 6-volt, 3.0 amp panels as earlier, we can see that when connected in series, the set will provide an output voltage of 54 volts (18 + 18 + 18) at 6.0 amps, yielding 324 watts (volts x amps) at full sun.
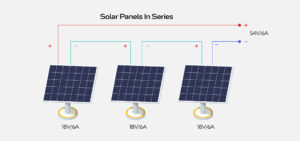
Now let’s look at putting solar panels in series with different nominal voltages but the same current ratings.
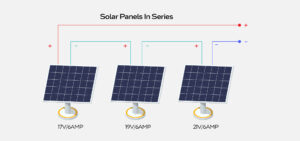
Solar Panels in Series with Different Voltages
In this system, all solar panels are of different types and power ratings but share a similar current rating. When they are linked in series, the solar panels generate 57 volts at 6.0 amps or 342 watts. Again, the output amperage remains at 3.0 amps, but the voltage output rises to 57 volts (17 + 19 + 21).
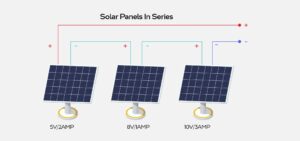
Solar Panels in Series with Different Currents
In this system, all solar panels are of different types and power ratings. The individual panel voltages will be added together as before, but this time the amperage will be restricted to the value of the lowest panel in the series string, which in this instance is 1 amp. The array will generate 23 Volts (5 + 8 + 10) at 1.0 Ampere alone.
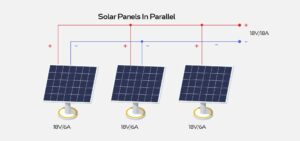
Solar Panel Wiring in Parallel
We’ll consider “Parallel Wiring” as our next way of connecting solar panels. The opposite of a series connection, a parallel connection increases the overall system current by joining solar panels together. To connect a single positive and negative connection to your regulator and batteries, you must first connect all of the positive terminals of your parallel-connected solar panels (positive to positive) and all of the negative terminals (negative to negative).
Parallel solar panel connections result in the output current being the total of the individual panels’ outputs as shown, but the overall voltage output being the same as for a single panel.
Solar Panels in Parallel with Same Voltages
All of the solar panels in this manner have the same type and power rating. Using the same three 18 Volt, 6 Amp panels as before, the total output of the panels, when connected in parallel, increases to 18 Amperes (6+6+6), providing 324 watts at full sun. The output voltage stays at the same value of 6 volts.
Solar Panels in Parallel with Different Voltage and Currents
The voltage adjusts to the lowest value, in this example 15 volts or a voltage value extremely near to 3 volts, but the parallel currents still pile up as before. For solar panels to function well in parallel, their output voltages must match. When the voltage of one panel is greater than the other, it will provide the load current until the higher panel’s output voltage is equal to the lower panel’s.
The 18-volt, 5-amp solar panel will only reach a maximum voltage of 15 volts due to the impact of the smaller panel on its functioning. This will result in a decrease in efficiency and a waste of money on the higher-power solar panel. It is not advised to connect solar panels with varying voltage ratings in parallel since the voltage output of the whole array is determined by the solar panel with the lowest voltage rating.
What would you need for Panel Wiring?/ Main Components for Solar Panel Wiring
Solar Panel
The core of a solar power system is a solar panel, often referred to as a solar cell or photovoltaic cell. Solar panels come in several varieties, including monocrystalline and polycrystalline ones. Compared to polycrystalline solar panels, monocrystalline solar panels are somewhat more costly and have a higher efficiency. A solar panel’s selection criteria might vary depending on factors including cost, technology type, efficiency, space, warranty, and warranty.
Charge Controller
As the name implies, a charge controller, often referred to as a charge regulator, is a device that controls the voltage and current coming from solar panels that are linked to batteries. In situations when there is no load or full sun, 12V solar panels offer 17–20V of power; the primary function of a charge controller is to avoid overcharging of batteries, which may also harm the battery.
Battery Bank
Batteries store backup charges. A solar power system uses a variety of batteries for storage and backup power throughout the night when the solar panels’ direct current is unavailable. The battery bank connection type—series, parallel, or series-parallel—depends on the system configuration—12V, 24V, or 48V. When there are clouds and no sunlight, the battery bank may be charged for later usage using an inverter and an AC supply from the power grid.
Inverter
An inverter is a device that converts a DC power source into an AC power source. For residential equipment that runs on AC electricity, an inverter and converter—also referred to as a UPS (Uninterruptible Power Supply)—are employed to convert DC power to AC.
Combiner Box
Combining the output from many solar strings is the purpose of the combiner box. The fused inputs’ output is combined into a single wire that links the inverter and box, with each string conductor landing on a fuse terminal.
Electrical Disconnect
The disconnect keeps the solar system separated from the grid, reducing the possibility of accidental energy transfer. During normal maintenance or repairs, technicians need a safe method to disconnect the solar system from the grid.
How to Connect Solar Panels?
Follow a few steps:
Install the Mount
First things first. attach the solar panel mounting brackets. The application will determine whether to employ flush mounts or roof-ground mounting. This base offers steadiness and reinforcement. It is carefully examined which way to place the PV panels—monocrystalline or polycrystalline. Once again, a little adjustment to the mounting structure is required. There is a range of 18 to 36 degrees for the tilt angle. To improve conversion efficiency, several businesses use solar trackers.
Put the Solar Panels in Place
Next, nuts and bolts need to be used to connect the solar panels to the mounting framework. To guarantee that the structure is strong and long-lasting, it is sufficiently safeguarded throughout.
Install the Electrical Wiring
The electrical wiring follows next. Universal connections, such as MC4, are utilized during cabling since they are compatible with any kind of solar panel. The following electrical connections may be established between these panels:
Series Connection
One PV module’s positive (+) wire to another module’s negative (-) wire.
Parallel Connection: Connections are positive (+) to positive (+), and negative (-) to negative (-).
Connect the Inverted to the Solar Battery as well
After that, connect the solar inverter and batteries. The positive terminal of the battery connects to the inverter’s positive terminal, while the negative terminal connects to the inverter’s negative terminal. A battery is essential for an off-grid solar system’s power backup.
The inverter should then be connected to the grid. To connect to the main power switchboard, use a standard plug. An output line connects the electrical board that supplies power.
Turn on the Solar Inverter
Turn on the inverter switch on the home’s main switch after all of the electrical wiring and connections are complete. Most solar inverters will include a digital display that will show you information about your solar unit’s production and use.
Troubleshooting Tips and Maintenance Practices
Testing System Performance: Checking the inverters for problems and malfunctions, keeping an eye on the amount of energy output, and doing shading analyses to make sure the panels get the most sun exposure are all part of routinely evaluating the performance of your solar panel system. You can keep your solar panel system running at peak efficiency by checking its performance regularly.
Identifying and Addressing Common Performance Issues: This includes identifying and fixing typical problems with solar panel systems, such as inverter failure, dirt and debris buildup, and shade from neighboring objects. Maintaining your solar panel system’s efficiency and efficacy requires prompt attention to these challenges.
Regular Maintenance Practices: Schedule expert inspections to detect any problems early, clean panels to remove dirt and debris, examine components for indications of damage or wear, and monitor system performance for any deviations as part of regular maintenance.
Let the Sun Power you up with Vishakha Renewables
Ultimately, if you want your solar energy system to work as efficiently as possible, you must master the art of solar panel wiring. If you want your solar panels to last as long as possible and work as efficiently as possible, you need to educate yourself on the various wiring setups, troubleshooting techniques, and maintenance procedures.
We, at Vishakha Renewables know how critical it is to have solar panels installed and maintained correctly. To fulfill your renewable energy requirements, you can rely on us, a top manufacturer of solar components in India, to offer you high-quality goods and services like:
No matter what your solar panel needs are, our team of specialists is available to help you with installation, troubleshooting, maintenance, or any other aspect of your system.